多数据源 get***、add*** 等等,
起步基础 本次的教程需要有springboot2.0集成mybatis 作为基础:
需要以上的步骤作为基础,运行成功之后可就可以开始配置多数据源了
开始动手 添加依赖 1 2 3 4 <dependency>
修改启动类 修改之前:
1 2 3 4 5 6 7 8 @SpringBootApplication @MapperScan ("com.winterchen.dao" )public class SpringBootMybatisMutilDatabaseApplication public static void main (String[] args) .class , args ) ;
修改之后:
1 2 3 4 5 6 7 @SpringBootApplication public class SpringBootMybatisMutilDatabaseApplication public static void main (String[] args) .class , args ) ;
因为改用多数据源,所以dao接口的扫描我们放在配置类中进行
修改项目配置 首先我们需要在配置文件中配置多数据源,看一下原本项目的配置:
1 2 3 4 5 6 7 8 9 10 11 12 13 14 15 16 17 18 19 20 21 22 23 24 25 26 27 28 29 30 31 32 33 34 spring: datasource: name: mysql_test type: com.alibaba.druid.pool.DruidDataSource druid: filters: stat driver-class-name: com.mysql.jdbc.Driver url: jdbc:mysql://127.0.0.1:3306/mytest?useUnicode=true&characterEncoding=UTF-8&allowMultiQueries=true username: root password: root initial-size: 1 min-idle: 1 max-active: 20 max-wait: 60000 time-between-eviction-runs-millis: 60000 min-evictable-idle-time-millis: 300000 validation-query: SELECT 'x' test-while-idle: true test-on-borrow: false test-on-return: false pool-prepared-statements: false max-pool-prepared-statement-per-connection-size: 20
*需要修改的地方: *
修改后:
1 2 3 4 5 6 7 8 9 10 11 12 13 14 15 16 17 18 19 20 21 22 23 24 25 26 27 28 29 30 31 32 33 34 35 36 37 38 39 40 spring: datasource: name: mysql_test master: jdbcurl: jdbc:mysql://127.0.0.1:3306/mytest?useUnicode=true&characterEncoding=UTF-8&allowMultiQueries=true username: root password: root driver-class-name: com.mysql.jdbc.Driver slave: url: jdbc:mysql://127.0.0.1:3306/mytest?useUnicode=true&characterEncoding=UTF-8&allowMultiQueries=true username: root password: root driver-class-name: com.mysql.jdbc.Driver read: get,select,count,list,query,find write: add,create,update,delete,remove,insert druid: filters: stat,wall initial-size: 1 min-idle: 1 max-active: 20 max-wait: 60000 time-between-eviction-runs-millis: 60000 min-evictable-idle-time-millis: 300000 validation-query: SELECT 'x' test-while-idle: true test-on-borrow: false test-on-return: false pool-prepared-statements: false max-pool-prepared-statement-per-connection-size: 20
需要修改地方:
(1) 在如上的配置中添加master、slave两个数据源;
注意!! 两中数据源中有一处是不一样的,原因是因为master数据源使用 Hikari连接池,slave使用的是druid作为数据库连接池,所以两处的配置分别为:
1 2 master: jdbcurl: jdbc:mysql://127.0.0.1:3306/mytest?useUnicode=true&characterEncoding=UTF-8&allowMultiQueries=true
1 2 slave: url: jdbc:mysql://127.0.0.1:3306/mytest?useUnicode=true&characterEncoding=UTF-8&allowMultiQueries=true
数据库的连接不一样的,如果配置成一样的会在启动的时候报错。
注意!!
dao接口方法的方法名规则配置在这里了,当然可以自行更改:
1 2 read: get,select,count,list,query,find write: add,create,update,delete,remove,insert
创建配置包 首先在项目的/src/main/java/com/winterchen/包下创建config包
创建config包
创建数据源类型的枚举DatabaseType 该枚举类主要用来区分读写
1 2 3 4 5 6 7 8 9 10 11 12 13 14 15 16 17 18 19 20 21 22 23 24 25 26 27 28 29 30 31 32 package com.winterchen.config;public enum DatabaseType {"write" ), slave("read" );this .name = name;private String name;public String getName () return name;public void setName (String name) this .name = name;@Override public String toString () return "DatabaseType{" +"name='" + name + '\'' +'}' ;
创建线程安全的DatabaseType容器 多数据源必须要保证数据源的线程安全的
1 2 3 4 5 6 7 8 9 10 11 12 13 14 15 16 17 18 19 package com.winterchen.config;public class DatabaseContextHolder private static final ThreadLocal<DatabaseType> contextHolder = new ThreadLocal<>();public static void setDatabaseType (DatabaseType type) public static DatabaseType getDatabaseType () return contextHolder.get();
创建动态数据源 实现数据源切换的功能就是自定义一个类扩展AbstractRoutingDataSource抽象类,其实该相当于数据源DataSource的路由中介,可以实现在项目运行时根据相应key值切换到对应的数据源DataSource上,有兴趣的同学可以看看它的源码。
1 2 3 4 5 6 7 8 9 10 11 12 13 14 15 16 17 18 19 public class DynamicDataSource extends AbstractRoutingDataSource static final Map<DatabaseType, List<String>> METHOD_TYPE_MAP = new HashMap<>();@Nullable @Override protected Object determineCurrentLookupKey () "====================dataSource ==========" + type);return type;void setMethodType (DatabaseType type, String content) "," ));
创建数据源配置类DataSourceConfig 1 2 3 4 5 6 7 8 9 10 11 12 13 14 15 16 17 18 19 20 21 22 23 24 25 26 27 28 29 30 31 32 33 34 35 36 37 38 39 40 41 42 43 44 45 46 47 48 49 50 51 52 53 54 55 56 57 58 59 60 61 62 63 64 65 66 67 68 69 70 71 72 73 74 75 76 77 78 79 80 81 82 83 84 85 86 87 88 89 90 91 92 93 94 95 96 97 98 99 100 101 102 103 104 105 106 107 108 109 110 111 112 113 114 115 116 117 118 119 120 121 122 123 124 125 126 127 128 129 130 131 132 133 134 135 136 137 138 139 140 @Configuration @MapperScan ("com.winterchen.dao" )@EnableTransactionManagement public class DataSourceConfig private static Logger logger = LoggerFactory.getLogger(DataSourceConfig.class ) ;@Autowired private Environment env; @Autowired private DataSourceProperties properties; @Value ("${spring.datasource.druid.filters}" ) private String filters;@Value ("${spring.datasource.druid.initial-size}" )private Integer initialSize;@Value ("${spring.datasource.druid.min-idle}" )private Integer minIdle;@Value ("${spring.datasource.druid.max-active}" )private Integer maxActive;@Value ("${spring.datasource.druid.max-wait}" )private Integer maxWait;@Value ("${spring.datasource.druid.time-between-eviction-runs-millis}" )private Long timeBetweenEvictionRunsMillis;@Value ("${spring.datasource.druid.min-evictable-idle-time-millis}" )private Long minEvictableIdleTimeMillis;@Value ("${spring.datasource.druid.validation-query}" )private String validationQuery;@Value ("${spring.datasource.druid.test-while-idle}" )private Boolean testWhileIdle;@Value ("${spring.datasource.druid.test-on-borrow}" )private boolean testOnBorrow;@Value ("${spring.datasource.druid.test-on-return}" )private boolean testOnReturn;@Value ("${spring.datasource.druid.pool-prepared-statements}" )private boolean poolPreparedStatements;@Value ("${spring.datasource.druid.max-pool-prepared-statement-per-connection-size}" )private Integer maxPoolPreparedStatementPerConnectionSize;@Bean (name = "masterDataSource" )@Qualifier ("masterDataSource" )@ConfigurationProperties (prefix = "spring.datasource.master" ) public DataSource masterDataSource () return DataSourceBuilder.create().build();@Bean (name = "slaveDataSource" )@Qualifier ("slaveDataSource" )@ConfigurationProperties (prefix = "spring.datasource.slave" )public DataSource slaveDataSource () throws SQLException new DruidDataSource();return dataSource;@Bean @Primary public DynamicDataSource dataSource (@Qualifier("masterDataSource" ) DataSource master, @Qualifier ("slaveDataSource" ) DataSource slave) {new HashMap<>();new DynamicDataSource();"spring.datasource.read" );"spring.datasource.write" );return dataSource;@Bean public SqlSessionFactory sqlSessionFactory (@Qualifier("masterDataSource" ) DataSource myTestDbDataSource, @Qualifier ("slaveDataSource" ) DataSource myTestDb2DataSource) throws Exception {new SqlSessionFactoryBean();this .dataSource(myTestDbDataSource, myTestDb2DataSource));"mybatis.type-aliases-package" ));new PathMatchingResourcePatternResolver().getResources(env.getProperty("mybatis.mapper-locations" )));return fb.getObject();@Bean public DataSourceTransactionManager transactionManager (DynamicDataSource dataSource) throws Exception return new DataSourceTransactionManager(dataSource);
以上的代码中:
(1) 注入类 Environment 可以很方便的获取配置文件中的参数
(2) DataSourceProperties和(4)中的 @ConfigurationProperties(prefix = "spring.datasource.master")配合使用,将配置文件中的配置数据自动封装到实体类DataSourceProperties中
(3) @Value注解同样是指定获取配置文件中的配置;
更详细的配置大家可以参考官方文档。
配置AOP 本章的开头已经说过,多数据源动态切换的原理是利用AOP切面进行动态的切换的,当调用dao接口方法时,根据接口方法的方法名开头进行区分读写。
1 2 3 4 5 6 7 8 9 10 11 12 13 14 15 16 17 18 19 20 21 22 23 24 25 26 27 28 29 30 31 32 33 34 35 36 37 38 39 40 41 42 @Aspect @Component @EnableAspectJAutoProxy (proxyTargetClass = true )public class DataSourceAspect private static Logger logger = LoggerFactory.getLogger(DataSourceAspect.class ) ;@Pointcut ("execution(* com.winterchen.dao.*.*(..))" )public void aspect () @Before ("aspect()" )public void before (JoinPoint point) "," );"className:{}, method:{}, args:{} " , className, method, args);try {for (DatabaseType type : DatabaseType.values()) {for (String key : values) {if (method.startsWith(key)) {">>{} 方法使用的数据源为:{}<<" , method, key);">>{}方法使用的数据源为:{}<<" , method, types);catch (Exception e) {
如上可以看到,切点切在dao的接口方法中,根据接口方法的方法名进行匹配数据源,然后将数据源set到用于存放数据源线程安全的容器中;
完整的项目结构了解一下:
完整项目结构
项目启动 启动成功:
1 2 3 4 5 2018-05-30 17:27:16.492 INFO 35406 --- [ main] o.s.j.e.a.AnnotationMBeanExporter : Located MBean 'masterDataSource': registering with JMX server as MBean [com.zaxxer.hikari:name=masterDataSource,type=HikariDataSource]
添加用户(write):
添加用户
日志:
1 2 3 4 5 6 2018-05-30 17:29:07.347 INFO 35406 --- [nio-8080-exec-1] com.winterchen.config.DataSourceAspect : className:com.sun.proxy.$Proxy73, method:insert, args:com.winterchen.model.UserDomain@4b5b52dc
可以看出使用的就是write数据源,并且该数据源是使用HikariPool作为数据库连接池的
查询用户(read):
查询用户
日志:
1 2 3 4 5 2018-05-30 17:29:41.616 INFO 35406 --- [nio-8080-exec-2] com.winterchen.config.DataSourceAspect : className:com.sun.proxy.$Proxy73, method:selectUsers, args:
可以看出使用的是read数据源。
源码地址:戳这里
springboot技术交流群:681513531

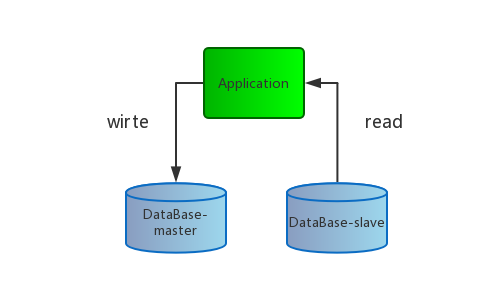 多数据源
多数据源 创建config包
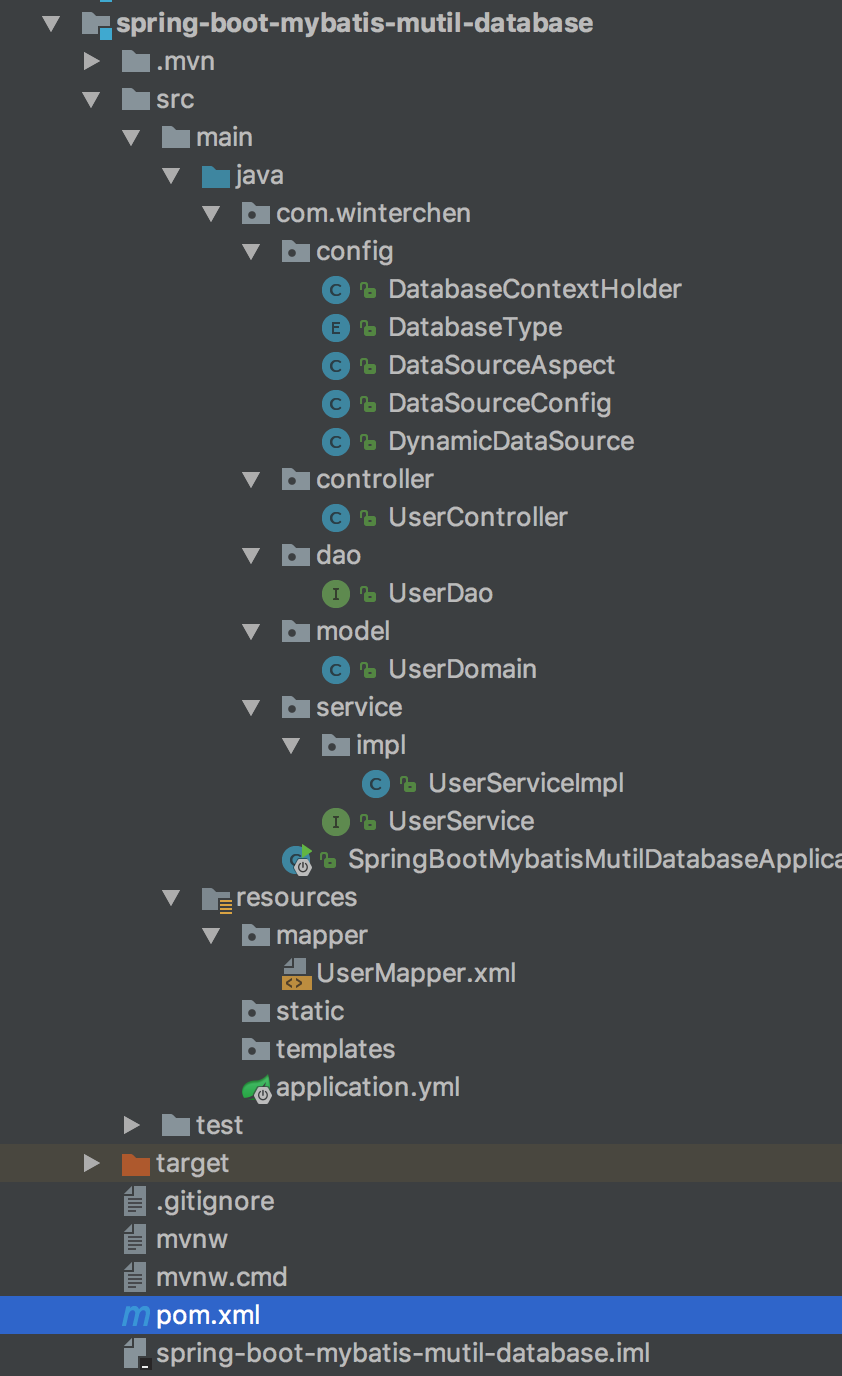 完整项目结构
 添加用户
添加用户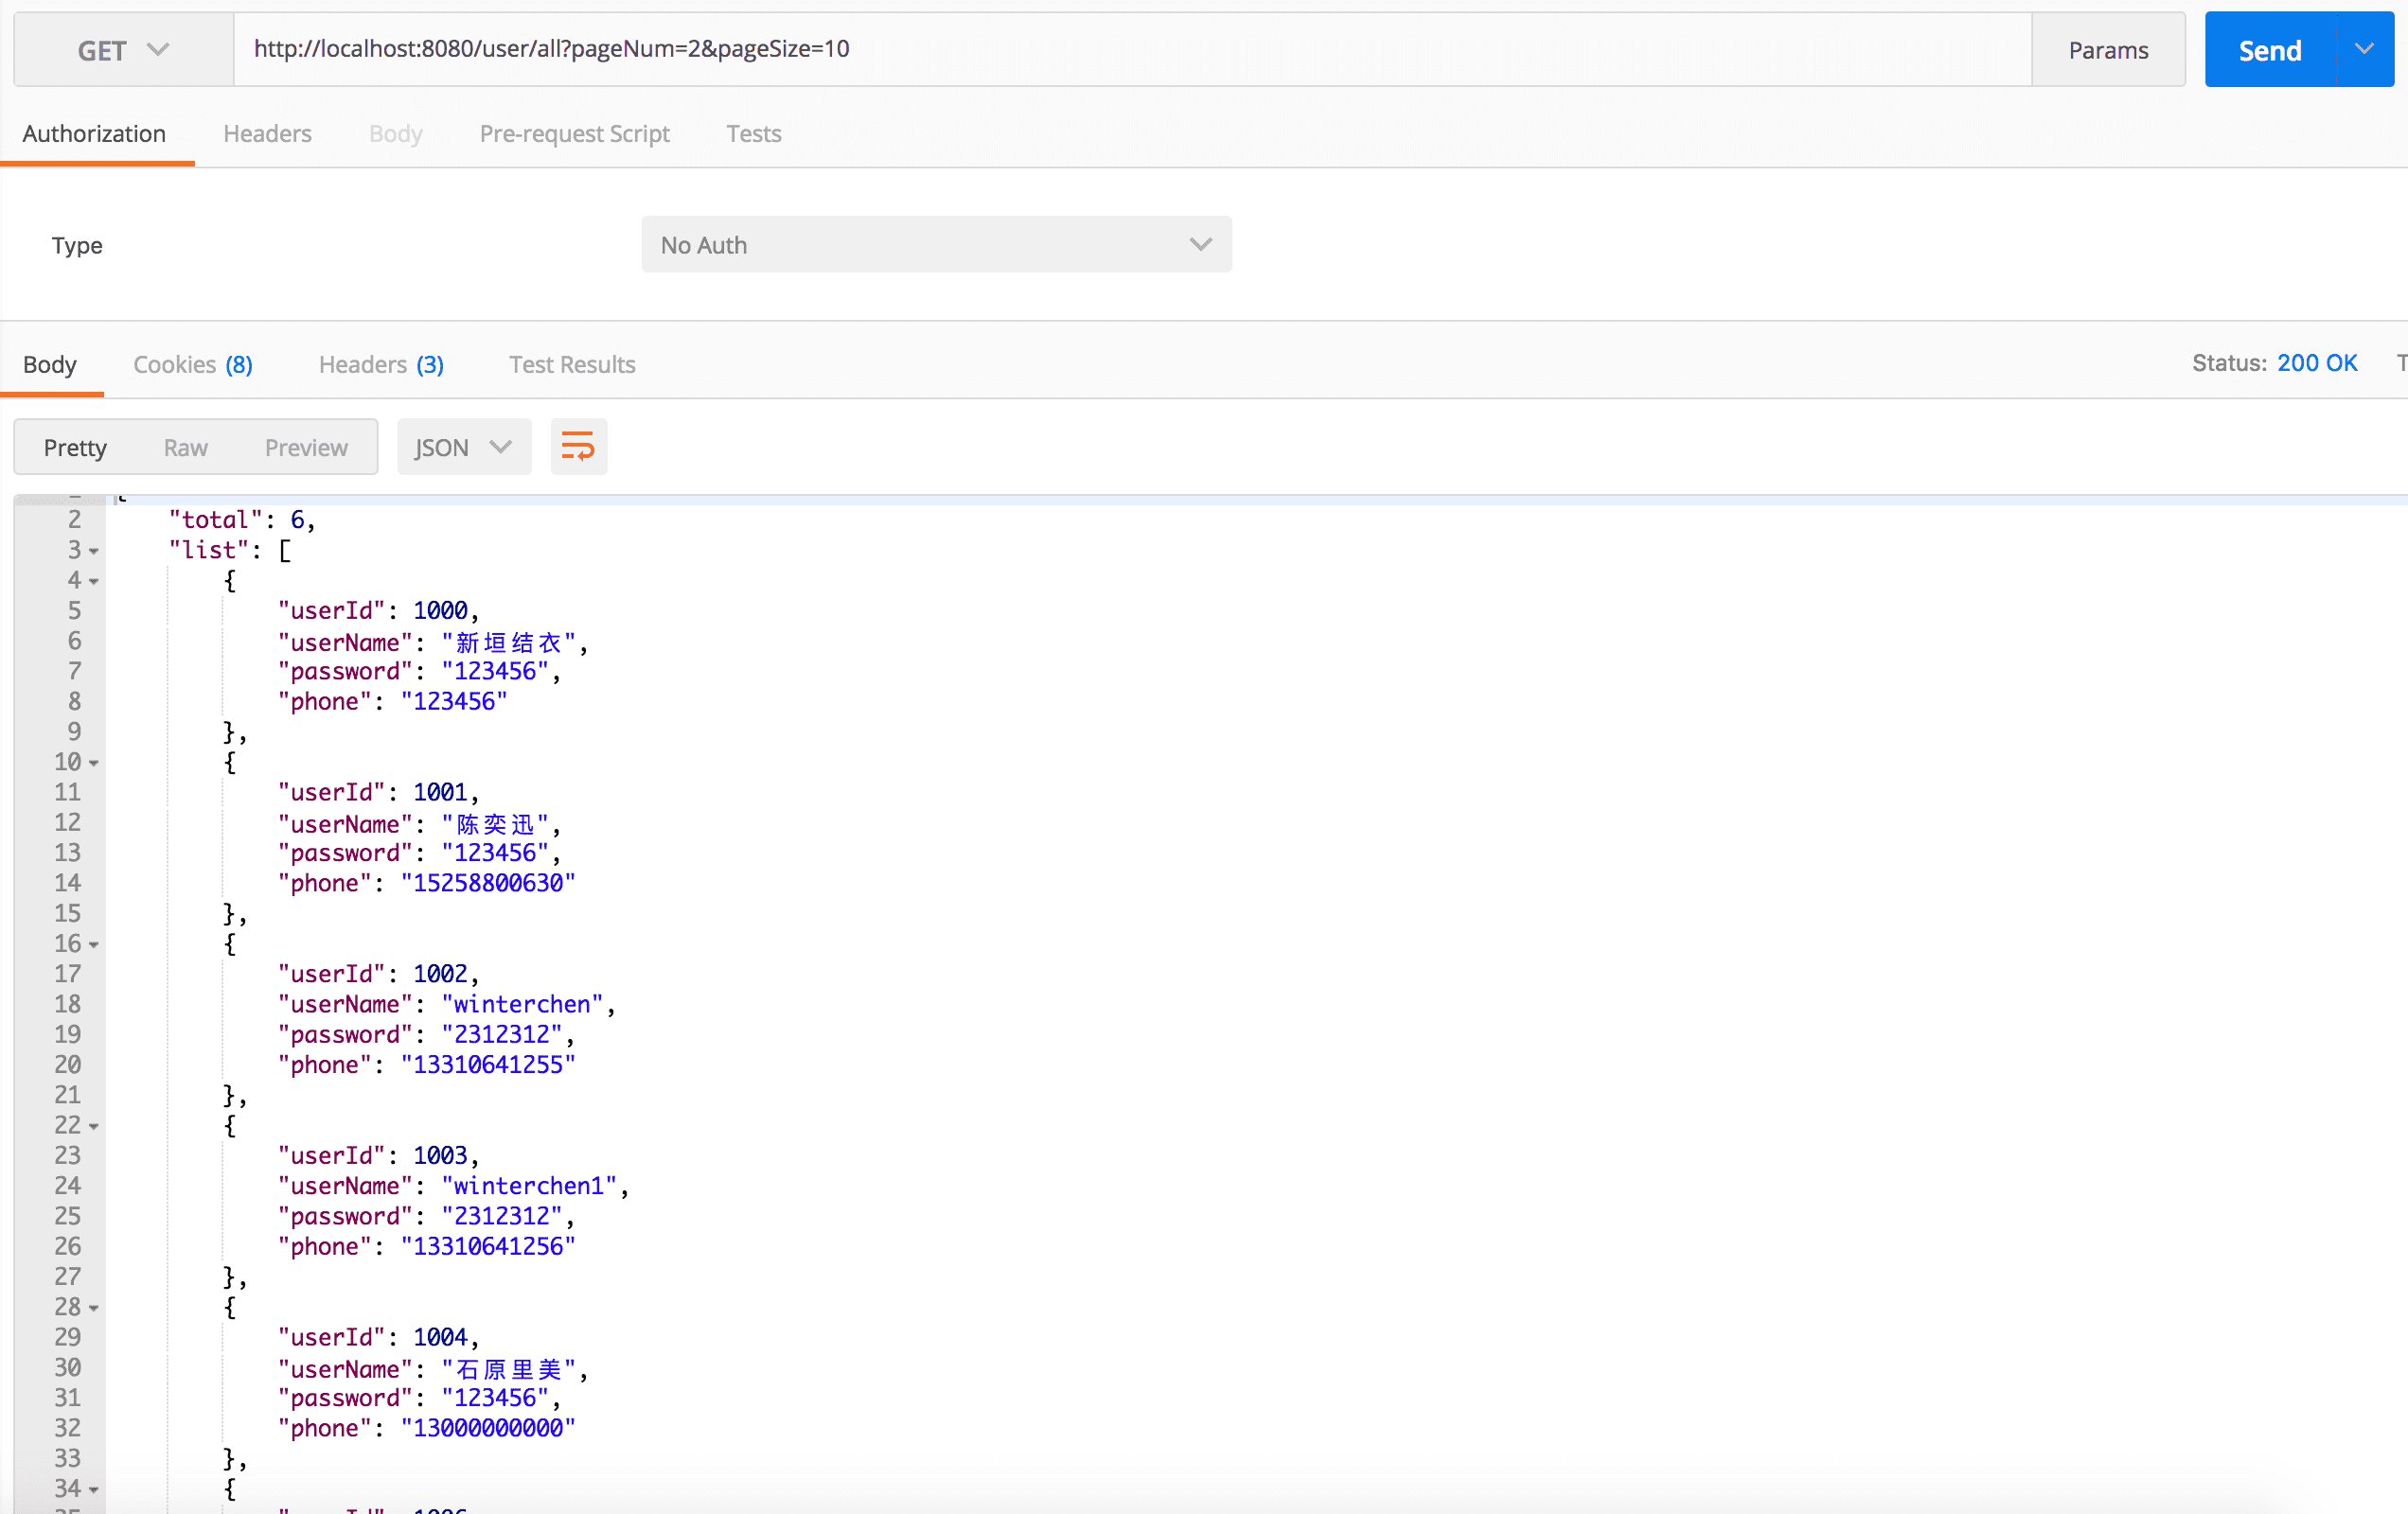 查询用户
查询用户