1
2
3
4
5
6
7
8
9
10
11
12
13
14
15
16
17
18
19
20
21
22
23
24
25
26
27
28
29
30
31
32
33
34
35
36
37
38
39
40
41
42
43
44
45
46
47
48
49
50
51
52
53
54
55
56
57
58
59
60
61
62
63
64
65
66
67
68
69
70
71
72
73
74
75
76
77
78
79
80
81
82
83
84
85
86
87
88
89
|
<?xml version="1.0" encoding="UTF-8" ?>
<!DOCTYPE mapper PUBLIC "-//mybatis.org//DTD Mapper 3.0//EN" "http://mybatis.org/dtd/mybatis-3-mapper.dtd" >
<mapper namespace="com.winter.mapper.UserMapper" >
<resultMap id="BaseResultMap" type="com.winter.model.User" >
<id column="user_id" property="userId" jdbcType="INTEGER" />
<result column="user_name" property="userName" jdbcType="VARCHAR" />
<result column="password" property="password" jdbcType="VARCHAR" />
<result column="phone" property="phone" jdbcType="VARCHAR" />
</resultMap>
<sql id="Base_Column_List" >
user_id, user_name, password, phone
</sql>
<select id="selectByPrimaryKey" resultMap="BaseResultMap" parameterType="java.lang.Integer" >
select
<include refid="Base_Column_List" />
from t_user
where user_id = #{userId,jdbcType=INTEGER}
</select>
<select id="selectAllUser" resultMap="BaseResultMap">
select
<include refid="Base_Column_List" />
from t_user
</select>
<delete id="deleteByPrimaryKey" parameterType="java.lang.Integer" >
delete from t_user
where user_id = #{userId,jdbcType=INTEGER}
</delete>
<insert id="insert" parameterType="com.winter.model.User" >
insert into t_user (user_id, user_name, password,
phone)
values (#{userId,jdbcType=INTEGER}, #{userName,jdbcType=VARCHAR}, #{password,jdbcType=VARCHAR},
#{phone,jdbcType=VARCHAR})
</insert>
<insert id="insertSelective" parameterType="com.winter.model.User" >
insert into t_user
<trim prefix="(" suffix=")" suffixOverrides="," >
<if test="userId != null" >
user_id,
</if>
<if test="userName != null" >
user_name,
</if>
<if test="password != null" >
password,
</if>
<if test="phone != null" >
phone,
</if>
</trim>
<trim prefix="values (" suffix=")" suffixOverrides="," >
<if test="userId != null" >
#{userId,jdbcType=INTEGER},
</if>
<if test="userName != null" >
#{userName,jdbcType=VARCHAR},
</if>
<if test="password != null" >
#{password,jdbcType=VARCHAR},
</if>
<if test="phone != null" >
#{phone,jdbcType=VARCHAR},
</if>
</trim>
</insert>
<update id="updateByPrimaryKeySelective" parameterType="com.winter.model.User" >
update t_user
<set >
<if test="userName != null" >
user_name = #{userName,jdbcType=VARCHAR},
</if>
<if test="password != null" >
password = #{password,jdbcType=VARCHAR},
</if>
<if test="phone != null" >
phone = #{phone,jdbcType=VARCHAR},
</if>
</set>
where user_id = #{userId,jdbcType=INTEGER}
</update>
<update id="updateByPrimaryKey" parameterType="com.winter.model.User" >
update t_user
set user_name = #{userName,jdbcType=VARCHAR},
password = #{password,jdbcType=VARCHAR},
phone = #{phone,jdbcType=VARCHAR}
where user_id = #{userId,jdbcType=INTEGER}
</update>
</mapper>
|


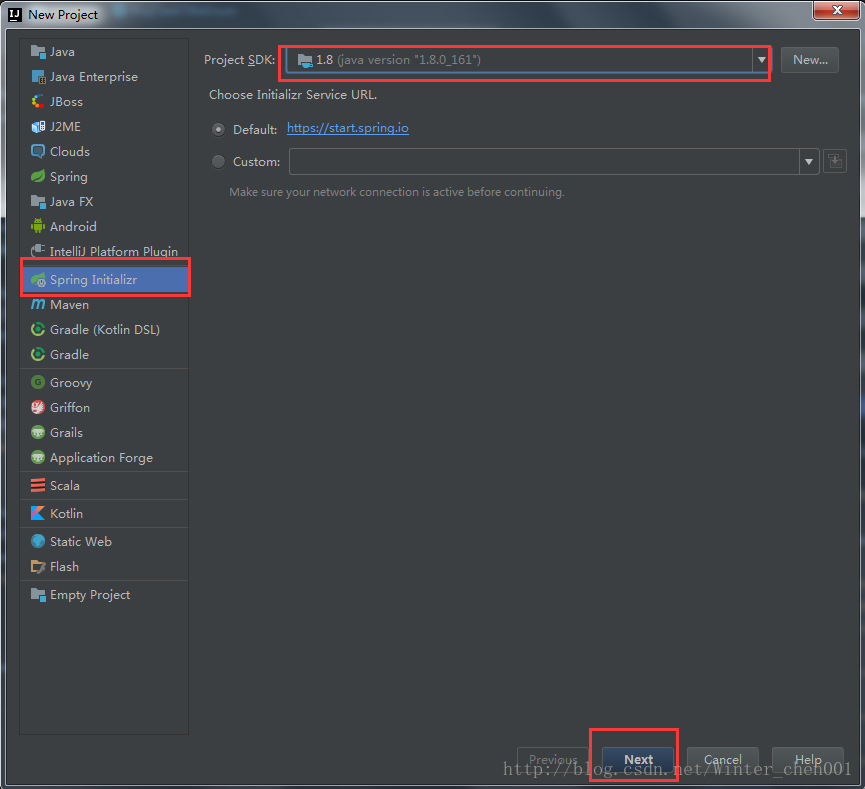 这里写图片描述
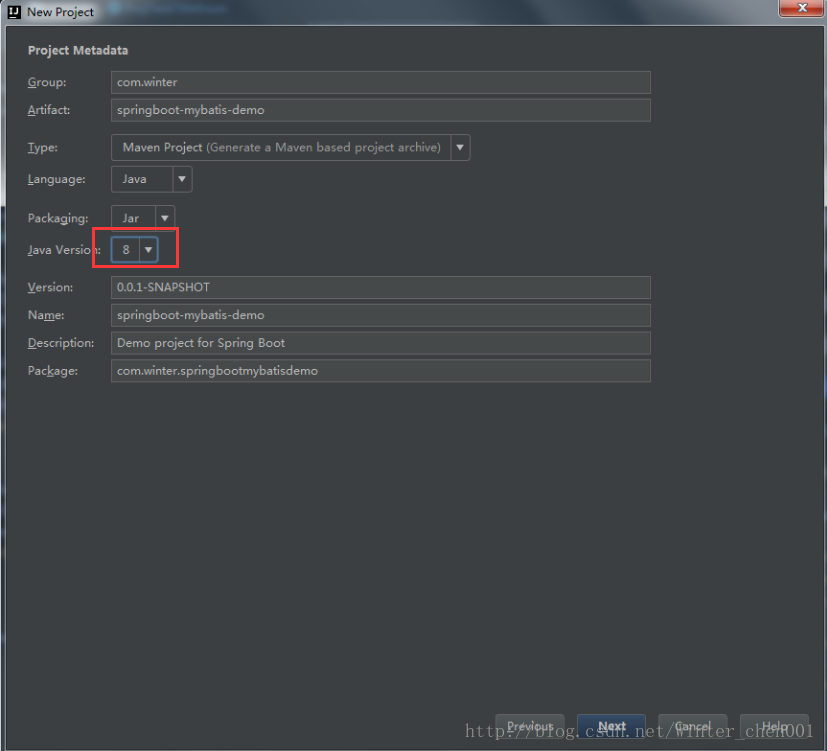 这里写图片描述
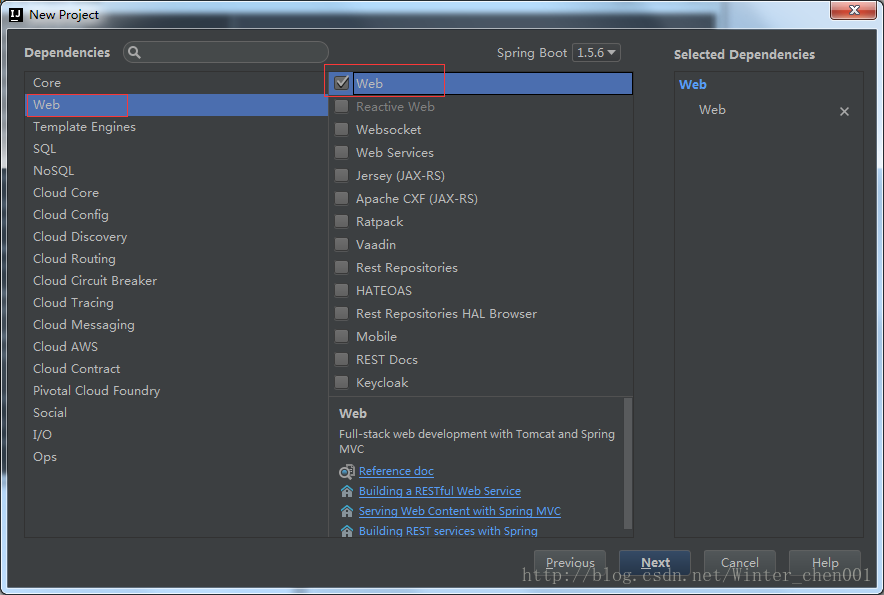 这里写图片描述
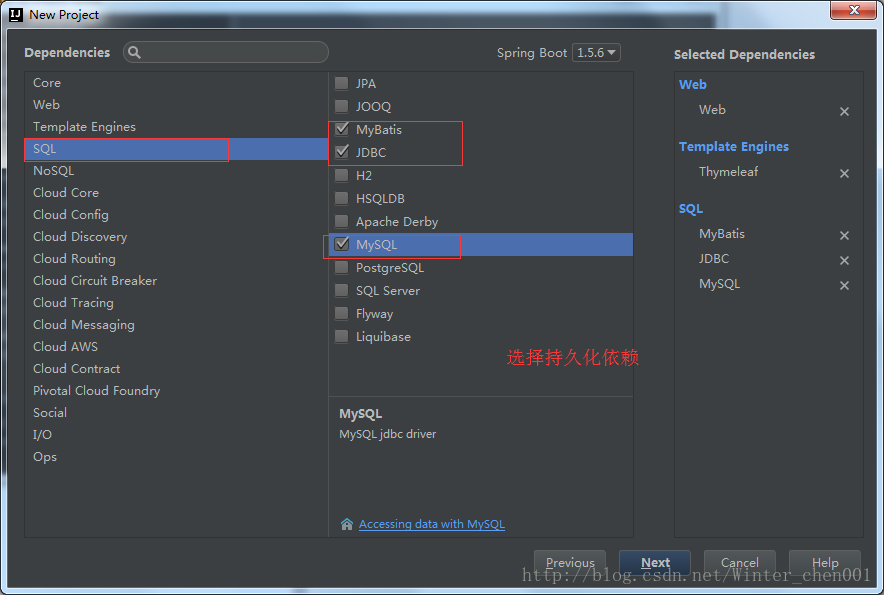 这里写图片描述
 这里写图片描述
 这里写图片描述
 这里写图片描述
 这里写图片描述
 这里写图片描述
 这里写图片描述
 这里写图片描述
 这里写图片描述
 这里写图片描述
 这里写图片描述